
Module · Roster & timesheets
Where to find it in the app
- Use it: Time & pay → Roster & timesheets
- Turn it on/off: your business name (top-left) → Settings → Modules → Time & pay → Roster & timesheets
Plan: Solo and Business · Module group: Your team · Navigation:
Time & pay → Roster & timesheets
1. Overview
Purpose. Build the weekly staff roster, let staff clock in/out, and turn the result into timesheets you can approve and export for payroll. It understands regular shift patterns, days off, business closures and casual shifts, and it respects approved leave.
The time clock is shift-aware: clock-ins are checked against the rostered shift, so you can capture lateness, no-shows and blocked attempts, and the app can auto-close a clock-out someone forgot. The clock is a separate on/off switch from this module (see §6a), you can run the roster without the clock, and you do not turn the clock off by turning the Roster module off.
2. When to use it
- To schedule who works when, by role.
- To capture worked hours and prepare payroll.
3. Required permissions
- View the roster (
roster.view). - Build / edit the roster (
roster.manage). - View timesheets (
timesheets.view). - Edit / approve timesheets (
timesheets.manage).
4. Navigation path
Time & pay → Roster & timesheets
5. What you'll see
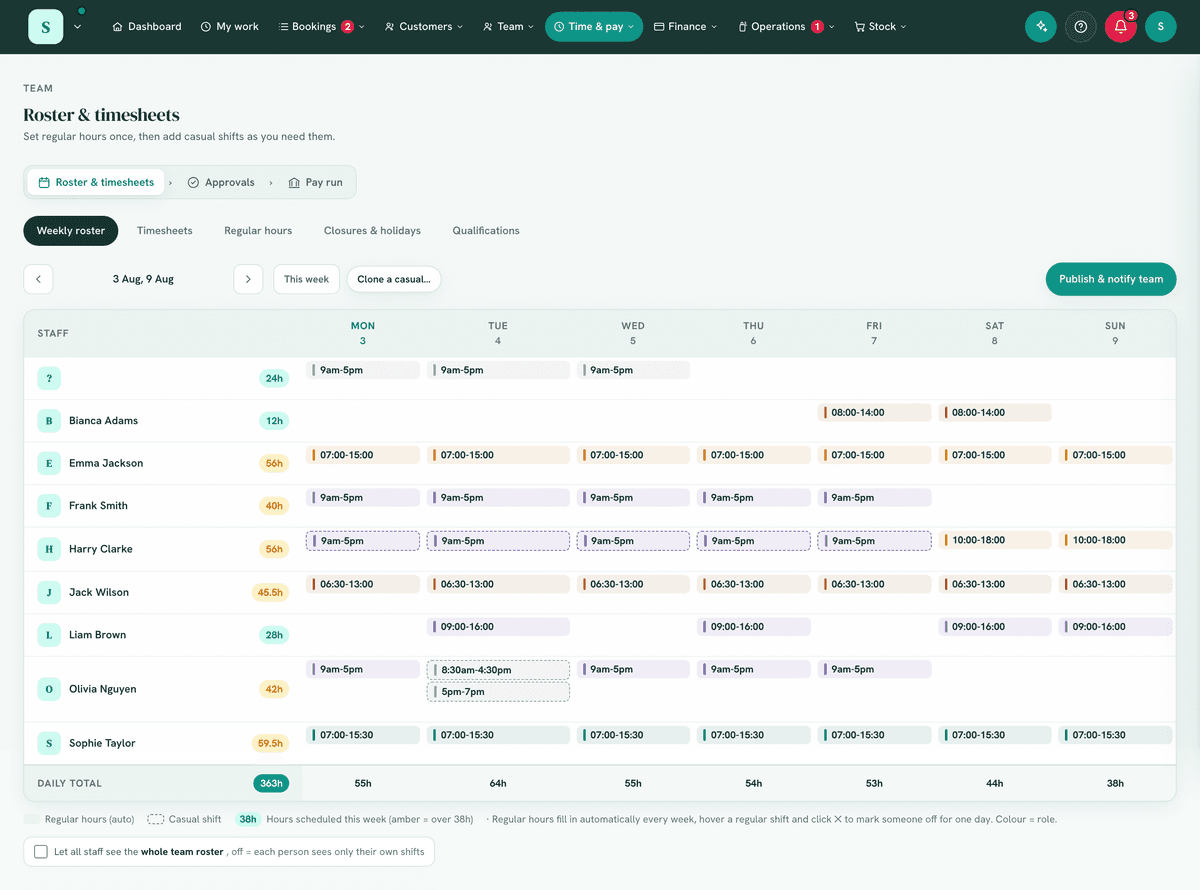
- A weekly grid of staff × days, with This week and week navigation.
- Shift blocks showing the role; regular patterns appear automatically, with day-off overrides and business closures marked.
- Controls to add a casual shift (including a typed name for a one-off).
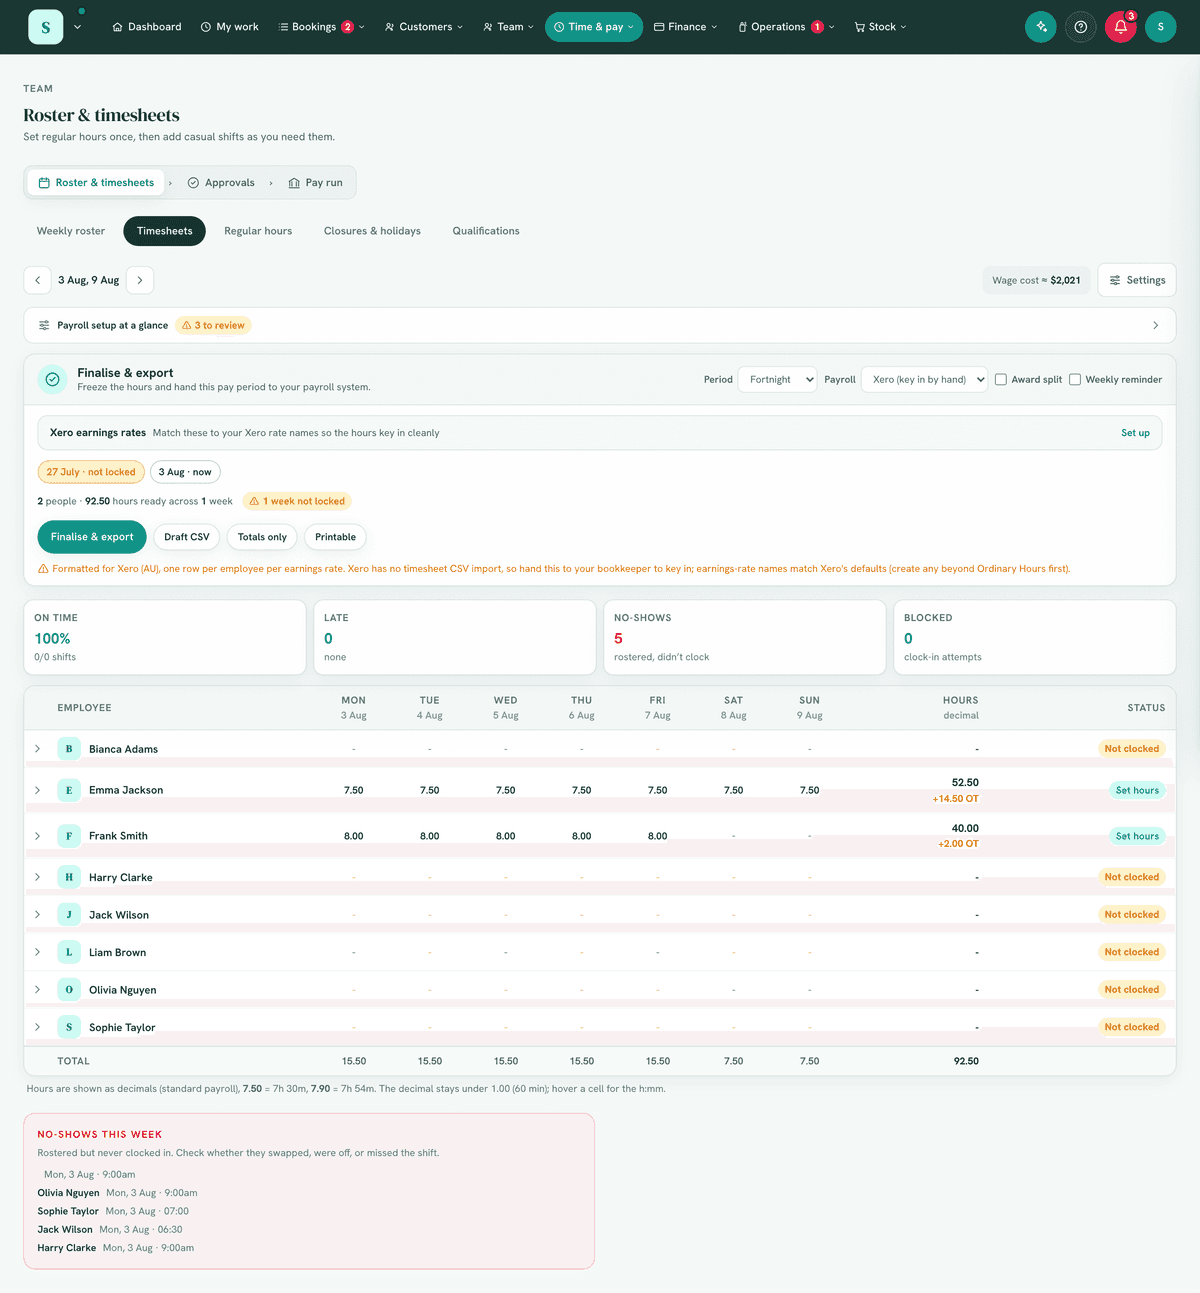
- A timesheets view to review worked hours, approve the week, adjust any single day (or a whole week in one press), and Export payroll CSV.
- An attendance read in Timesheets: on-time %, lateness, no-shows and blocked clock-in attempts for the week, plus a Time in lieu (TOIL) running balance per person. Auto-closed clock-outs are flagged for you to confirm.
6. Turning it on
Settings → Modules → Your team → Roster & timesheets. Set your staff up in
Team → Staff list; their regular patterns and any closures flow into the grid.
6a. The time clock is a separate switch
The clock in/out feature has its own on/off switch, separate from this module: Settings → the "Team" tab → the "Time clock" card → "Use the time clock".
- Turn the clock off there if you don't track hours this way, the roster still works. Turning the Roster module off is not how you turn off clocking, and is a common mix-up.
- Solo (one-person) accounts hide the clock automatically.
- Just below the toggle are the clock-in rules, see §7b.
7. Step-by-step tasks
7a. Build the roster
- Open
Time & pay → Roster & timesheetsand pick the week. - Add or edit shifts per person, setting the role (e.g. Floor, Kitchen).
- Regular patterns pre-fill; use a day-off override where someone isn't working, and add casual shifts as needed.
- Business closures (e.g. a public holiday or training day) block the day.
A closure is whole days, for the whole business. It also tells the roster you are shut. To hold back one room, one thing you offer, or part of a day while the team keeps working, block it out on the Calendar instead. See Calendar.
Changing somebody's standard week changes the roster ahead of it. Regular hours
flow into the roster as many weeks ahead as you choose at the top of the
Regular hours tab. When you edit somebody's standard week, the shifts already
sitting on those upcoming weeks are re-made to match, and the save tells you how
many moved. Three things are deliberately left alone:
- Today and anything past. It may already be worked, and paid.
- Any shift you have edited by hand. Once you change one day's hours, move it, or hand it to somebody else, it is yours, and no change to the standard week will overwrite it.
- Casual shifts and days off. They were never made from a standard week.
If a week you already published changes, publish it again. The save says when that has happened, and the roster keeps saying "Changes have been made. Re-publish to let them know" until you do. Re-publishing reaches only the people whose own shifts moved, so a change to one person's standard week does not email the whole team. See §7a-iv.
With auto-fill set to Off (manual), nothing is added or removed: the roster is yours to build, so saving a standard week leaves the upcoming weeks exactly as they are.
Who appears on the grid. Everyone with regular hours appears every week. Casuals and temps appear in weeks they have a shift, regular hours, a date they have marked available or unavailable, approved leave or an on-call marker, and are otherwise folded away, with a line above the grid saying how many and a Show everyone link that remembers your choice. A business with nobody on regular hours never folds anyone: the fold is for tucking a bench of casuals behind a core team, and with no core team it would hide the people you are there to roster. Whoever builds the roster can also choose Always show everyone, which applies to the whole business, and change it back from the same place.
Availability warnings. The grid knows each person's stated weekly
availability plus any date-specific casual exceptions (a casual marking a
particular day off or open), and it flags a shift you drop on a time someone
said they can't work, so you can rethink it or go ahead. Casuals set their
date-specific availability with a per-business notice period you configure at
Settings → Team.
When a casual marks a day unavailable. They do it from their My work page, with an optional note, and it needs no approval. You are told straight away: an email to whoever builds the roster ("Anna is unavailable Wednesday 21 October"), and a line in the bell that opens the right week. On the roster that day carries a red Unavailable block, and their row is drawn for that week even if nothing is rostered. Click the block, or an On leave or Needs cover tag, and a small panel says who, which day, the reason they gave, and where to act. If a shift is already on the day the block turns solid and says Shift conflict. Under the week arrows a one-line Who's away strip counts this week and the days ahead, and its button opens a Who's away panel: unavailable days, approved leave and shifts needing cover from today, one collapsed line per person, a window of the next 2 or 4 weeks or everything, and a name search. Click a date there to jump to its week. Each day header also shows how many people are away that day. The Calendar's staff views show the person as away with "Unavailable". A casual can only mark their own days; approved leave still comes through Requests.
7a-i. Somebody calls in unwell (personal leave)
You don't need them to fill anything in. Open their shift on the roster and press Record personal leave, then confirm. One action does the whole phone call:
- their personal leave is recorded on their behalf (under your business's own personal / carer's leave type, paid or unpaid by their employment type), marked as entered by you,
- their shift is cleared for that day, they drop off the kiosk's clock list, and their day closes to new bookings,
- any customer bookings with them that day are listed right there, each with a Reassign button offering only colleagues who genuinely have that time free. Moving several across different times or days? The link underneath opens their calendar day, where Move day refits the whole list for you,
- and they get one calm email saying it's recorded and there's nothing they need to do.
The paid personal leave then flows through to pay on its own: the Timesheets grid shows the day as LV with the hours it covers, the weekly total says "incl leave", and the payroll export carries it as its own earnings line (for example "Personal / carer's leave, 8.00") so your bookkeeper keys it at the right rate. A leave day pays the hours the roster knows about, the shift it displaced or the person's regular hours; a week you have adjusted by hand is never changed behind your back.
If they had already requested that day off, the button approves their request instead of double-recording it, and a day already covered by approved leave is left alone. It needs both the approve leave and manage roster permissions, so owners and managers have it out of the box.
7a-ii. Publish the week, and add a note to the team
When the week is ready, press Publish & notify team. A short panel opens before anything is sent, telling you how many people are on the roster this week; each of them gets an email with their own shifts, and nobody sees anybody else's.
Add a note to the team. Tick the box and write anything you would normally put in a separate email: "Hey team, here's the roster for the week, the coffee delivery moves to Tuesday…" It goes at the top of their email, above their shifts, exactly as you typed it. A preview underneath shows how they will read it before you send.
- Nobody sees the note in isolation. It also appears on the roster for that week and on each person's My work, so somebody who reads the app instead of their inbox still gets it. Anybody with no email address on their team card will only ever see it there.
- People with no shifts that week hear nothing unless you ask. When you add a note, a second tick offers to send it to the team members who are not on this week, which is what you want when the note is about a meeting rather than the shifts. They get the note on its own, with no shift list.
- The two emails read differently, and the preview shows both. The people on the week get "Your roster for 17 to 23 Aug", your note, and then their shifts. The people who are not on it get "Frank's note to the team, 17 to 23 Aug", headed A note from Frank, and their first line says plainly that they have no shifts this week before handing over to your note, so nobody is left hunting for shifts that are not there.
- Reuse last week's words with one press when the note is a standing message. It is offered as a button rather than filled in for you, so a week-old note can never go out by accident.
- Re-publishing re-sends, and replaces the note with whatever is in the box. Publish with the box unticked and the previous note is cleared.
- The note holds up to 2,000 characters. If you go over, the app says by how much and refuses to send rather than quietly cutting the end off.
7a-iii. On call: not rostered, but ring me
Somebody who is not working a day but is happy to be phoned if you get stuck goes on the roster as on call. It is not a shift: it is never hours worked, never reaches a timesheet, and never touches their pay.
To put somebody on call, press the + in their empty day, switch the top of the panel from Working shift to On call, and press Put on call. That is it. Nothing has to be set up first: it works for anybody on your team list, including people with no login at all.
- All day unless you say otherwise. Tick "Only for part of the day" and set a From and To if they are only around in the morning.
- It shows on the roster as a dashed On call marker in that day, so you can see at a glance who to ring on Saturday. Hover it and press ✕ to take it off.
- Nothing is added to the hours, theirs or the day's total.
- They are told when you publish, exactly like a shift: they appear on the re-publish list as "Sat 29 Aug added, On call". Their email marks the day "Sat, 29 Aug · ON CALL" next to the hours (or "All day"), with a highlighted box above the list that says "On call means you are not rostered on for that day, but we may ring you if we get stuck", so nobody reads it as a shift with the times missing. Their My work says the same thing.
- Somebody folded away as "not on this week" comes back the moment you put them on call, because they are now part of the week.
- Anyone who can build the roster can do it, so an owner, a manager, a supervisor, or whoever you have given the roster permission to.
On call is not the same as availability. Availability is a standing statement your team make about themselves in My work: which days they can work at all, and between what hours. The roster warns you when you drop a shift on a day somebody said no to, and it never blocks you. On call is you saying, for one day, that this person is your backup.
7a-iv. Changing a week the team already has
Publishing is the only thing that sends anything. Change a shift on a week you have already published and nobody is emailed on the spot. The roster says so, in orange, next to the button:
Changes have been made. Re-publish to let them know.
Press Re-publish and the panel lists only the people whose own shifts have changed, by name, with what changed beside each one, and a tick you can clear:
2 people have had a change since you published on 22 Aug. Only they hear from you. The other 7 people on the week are left alone.
☑ Murray Wells, Sat 29 Aug added, 8:30am to 1:00pm ☑ Sarah Kidd, Wed 26 Aug now 8:30am to 1:00pm
Nothing goes out until you press the button, and the button says exactly who it reaches: Publish & email 2 people.
Everything counts as a change, not just adding a shift: new times, a new day, a different role, handing a shift to somebody else (both people are listed), removing one, marking somebody off the day, and the bulk fills. Change something and change it back, and nobody appears on the list at all, because nothing about their week is different.
Clear a tick and that person is left out on purpose. Their row says so, and they stay on the list next time, because a change nobody has heard about is not finished. Use it when you have already rung them.
A note goes to whoever is being emailed, and the box says who. With one person on the list it reads "Add a note for Murray", and underneath, "Only Murray Wells will read this". So "Sorry Murray, I forgot you couldn't make it that day, so I have changed it" reaches Murray and nobody else. With everyone on the list it is the note to the team, as in §7a-ii.
Somebody with no login is listed but has no tick, because there is nowhere to send them anything. Their row says "No login yet, so you will need to tell them yourself."
They get a change in the app as well as by email: on the bell and on their phone if they have notifications turned on. That is the one that always arrives, which matters for casuals with no email address on their card.
"Send the whole week to everyone on the roster again" is a tick on the same panel, off by default, with the number on it. Use it when the week has changed a lot and you would rather the whole team had it fresh.
Nothing is sent for a week you have not published yet. While you are still building a roster, moving shifts around tells nobody. The first press of Publish is what starts the conversation, and it reaches everybody who is on.
7b. Clock in / out (staff)
Where staff clock in:
- From "My work" in the top nav (their own page, clock in/out + this week's hours + their roster), or
- From a paired tablet kiosk set up as a Staff kiosk. Setting one up is a QR you scan with the tablet's camera, see Kiosk (a tablet on the counter).
Worked time builds their timesheet, and who's currently clocked in shows on the dashboard (On shift).
Clock-in rules (Settings → the "Team" tab → Time clock, under Clock-in rules),
these only bite where you use the Roster module:
- Only clock in with a rostered shift, no shift now → clock-in is blocked, the person is told why, and the attempt is logged for you (see attendance in §7d). Owners/managers can always clock in, just flagged if there's no shift.
- Clock-in opens N min before the shift starts.
- Late after N min grace, past that, the clock-in is recorded as late.
- Max shift length, used as a backstop for forgotten clock-outs.
On-site (GPS) check, optional. You can require staff to be at the workplace
to clock in: turn on Location check on clock-in (Settings → Team, shown
when the Roster module is on), pin your workplace and set a radius.
- Pin the workplace, not wherever you are. Setting this up at home pins your house, and every clock-in at the shop then fails the check. Use my business address pins it from the address you have already saved, so you can do this from anywhere. Update pin to here uses the device you are holding, which is the right button when you are standing on site.
- A clock-in from outside the radius is flagged on the timesheet, or blocked if you make the check required, and the person is told how far off-site they are.
- A clock-out is never blocked, however strictly the check is set. It is flagged instead. Refusing it would leave the shift open until the auto clock-out closed it hours later, which puts MORE hours on the timesheet, not fewer.
- Where the flag shows: open the person's row in Timesheets and it is written under the punch, with the distance ("Clocked in 1.2 km from the workplace"). Blocked attempts are counted separately, on the attendance panel.
- A vague location is not treated as evidence. Phones indoors often only know the suburb, so a fix that cannot separate "at work" from "not at work" is left unflagged rather than held against somebody. It never blocks a clock-in either.
- The kiosk is exempt, a paired tablet is already on site.
Kiosk identity, name vs PIN. On a shared kiosk, choose how a person proves
who they are at Settings → Kiosk → "How staff clock in" (full guide:
Kiosk (a tablet on the counter)):
- Tap your name, simplest, but a colleague could tap your name.
- Personal PIN, each person types their own PIN, so no one can clock a workmate in or out. Use this to stop "buddy-punching". PINs are set per-person on the same Kiosk tab (managers only), stored encrypted and never shown.
7b-ii. Breaks, and how one reaches the timesheet
The clock is start work / stop work. There is no "start break" button. So a break gets onto a timesheet one of three ways, and it is worth knowing which one your business is using, because it decides what people are paid.
- Someone punches out and back in. The gap between the two punches is simply not worked time, so it is unpaid automatically with nothing to type. Coming back is treated as coming back: it is not recorded as a late arrival, your team is not told anyone was late, and it counts as one shift rather than two on the attendance figures.
- You type it on the timesheet. Each clocked row has a break box in minutes on the Timesheets tab. Whatever you type is taken off the paid time for that row, and the change is recorded in your activity log with the old and new value. Do not use both at once. If somebody already punched out and back in, the gap is out of their pay, so typing those minutes in the box as well takes them off twice. The box is for the days nobody punched anything.
- An automatic rule. On the Timesheets tab, open the settings control and turn on Unpaid breaks: "deduct N minutes from any shift longer than H hours". By default that rule applies only to rostered hours, not to clocked ones. A separate tick, Also apply to clocked time, extends it to the clock.
Before you turn on the automatic rule, read this. It deducts a break whether or not the break happened. If a busy Saturday means nobody got their 30 minutes, that rule still takes 30 minutes off their pay. An amount you typed for a row always wins over the rule, including a deliberate zero, so you can correct any day the rule got wrong.
Paid rest breaks are not this. Several awards give a short paid rest break as well as the unpaid meal break, and paid ones must not be deducted at all. The break box and the automatic rule are for unpaid breaks only, so leave paid rest breaks out of both.
Nobody outside the payroll seat sees a break figure. The break box is on the Timesheets tab, which needs the timesheets permission. A casual who clocks in at the tablet and has no login never sees what was deducted, so if you type breaks in by hand it is worth telling people that is how it works.
7d. Attendance & auto clock-out
- The Timesheets tab summarises the week's punctuality, on-time %, who was late (and by how long), no-shows (a rostered shift with no clock-in) and blocked attempts. Punctuality counts one shift per shift: someone who punched out for lunch is one arrival, not two, so taking a break never flatters or damages their record.
- Somebody forgot to clock on and it says they were late. Two ways to settle
it, and they mean different things.
- The time on the record is wrong. Correct it: open the person's row, press the clock icon beside the entry and type the time they really started. The lateness is worked out again from the shift they were rostered for, so the badge, their late count and the week's on-time % all correct themselves. The punch they made is still kept, and so is your name against the change.
- The time is right, but it should not count. Someone learning the system, or a start you agreed to, is not an attendance problem. Press Don't count it beside the lateness. The punch and the minutes stay exactly as they were recorded, the row keeps showing them marked not counted, and only the figures change. Count it puts it back. ⚠️ Never fix a figure by editing a time that was right. The hours on a timesheet are a legal record of what somebody worked and have to stay true, which is exactly why the second option exists.
- Forgot to clock out? If someone forgets, the app closes it for them, at
their rostered shift end plus the auto clock-out grace, or the max shift
length if they had no shift. It's marked auto clock-out · check, left
unapproved for you to confirm, and never paid automatically. The grace
is set at
Settings → the "Team" tab → Time clock → "Forgot to clock out?".- Set the grace to how long past a shift end your team might genuinely still be working, up to 8 hours. Anyone still on the floor inside the grace is left alone and their real hours are kept; the default 20 minutes is what signs a busy closer out at their rostered end.
- ⚠️ The two rules meet. Whichever comes first closes the entry, so a grace longer than the gap between the shift and your max shift length hands the job to the max-shift rule instead: the entry is then closed at clock-in plus the max shift rather than at the rostered end, which records 16 hours for somebody who worked 8. For a standard 8-hour shift on the default 16-hour max that crossover is at 8 hours, which is why the grace stops there. If you need more headroom, raise the max shift length as well.
7c. Approve & export timesheets
- Open the timesheets view.
- Review hours; adjust any day that needs it (below).
- Approve week when correct.
- Export the approved hours for payroll, as a CSV, or as a Printable summary: one page per person to read from while you enter hours into Xero, QuickBooks or MYOB.
7c-i. Rostered vs clocked, and the ⚠ flags
Each person's row shows what they were rostered, what they clocked, and what the week will pay. A day where the clock disagrees with the roster carries a small ⚠. Click that day to answer it, one click each:
- Rostered pays the rostered hours for that day (the extra time was not work, or the early finish is forgiven).
- Clocked pays what the clock recorded (the extra time was real, approved work; a late start is docked).
- Or type any figure in between, as hours (5.5) or hours and minutes (5:30 or 5h 30m). The box shows what it comes to before you save, and refuses anything that is not a time.
Answering a day clears its flag. The two buttons on the row (Rostered / Clocked) do the same thing for every day of the week at once, and the week's total is always the sum of its days. Reset puts the week back to the default (the clock, for people who clock).
7c-ii. Round to roster (stop tidying 2-minute differences)
Round punches to the nearest 5, 10 or 15 minutes. Under Round to roster in the timesheet settings. Each clock-in and clock-out moves to the nearest mark, up as often as down, so it evens out over time and never only shortens a shift; the Fair Work Ombudsman has said rounding hours down is not acceptable, so that is the only kind offered. Round to roster is applied first: a punch inside the grace counts as the rostered time and is not rounded again. Off by default. The expanded row shows the punch as clocked beside the time it was paid as.
Hours as 7h 30m or 7.50. The switch under the grid sets how you read it; the payroll file is always in decimals.
If your team clocks a few minutes either side of their shift and you just pay the rostered time, turn on Settings → Round to roster (on the timesheets view). A punch within the grace (10 minutes unless you change it) of its rostered start or finish counts as the rostered time automatically: nothing to click, no flag, and 3 minutes early or late never changes anyone's pay in either direction.
Differences bigger than the grace are real, so they pay the clock and carry the ⚠ flag for you to accept, decline or adjust as above. The attendance record is untouched either way: the punch is stored exactly as it happened, and late arrivals still show as late. Rounding changes what is paid, never what is recorded.
You can always see and pay the real minutes. Open a person's row and each punch is listed with the times exactly as clocked next to the hours it pays, so a 9:00am to 5:06pm day shows those times beside its 8h 0m. The hours it pays carry a clocked 8h 6m chip beside them whenever rounding moved the figure, and a plain line under the punch spells it out: "Paid as 9:00 am to 5:00 pm, rounded to the roster." So the printed times always explain the hours beside them.
Clicking that day offers Before rounding 8h 6m as a one-click choice if you would rather pay the extra six minutes. Rounding is a default, never a lock.
Which figure is the one you pay? The rounded one. Reading a row left to right: the punch times are what the tablet recorded and never change, the line underneath says what those ends pay as, and the bold hours are what goes to payroll. Any of it can be overridden until the week is locked, and locking is what freezes it.
Breaks show when they were taken. The same line names each punched break, for example "Breaks 1:45 pm to 2:15 pm and 3:30 pm to 3:40 pm.", next to the total that comes off the paid hours. A break's time of day never affects pay: thirty minutes taken at 1:45 pays exactly the same as thirty minutes taken at 1:00, so a break running late needs no adjustment. If somebody types a different break total over the top of what was punched, the line says so, because both facts are true and the times must not be read as the reason for a number a person changed.
Approve the matching ones automatically. With round to roster on, a second switch appears under it: Approve these automatically. A finished punch that is inside the grace at both ends needs no sign-off, because it already pays the rostered time, so approving it decides nothing. It is off until you turn it on, and it is never retroactive.
Five things it will not wave through, all of which still wait for you:
- a punch outside the grace at either end, because the pay differs from the roster
- a shift still running
- a forgotten clock-out that the app closed for you, since nobody punched that finish
- a punch with no rostered shift to compare against
- a long shift with no break recorded, where the business tracks breaks
An entry the system passed through is marked matched the roster rather than approved by a person, and it stays editable until you lock the week. The lock is the real freeze; an automatic approval is only the app declining to interrupt you. A punch you approve yourself behaves exactly as it always has.
Your payroll system gets the paid hours. The CSV, the printable summary, the Xero timesheet push and a locked pay period all read the same figures as the screen, so what you approve is what payroll receives. A week you have already locked keeps the hours it was locked with: changing this setting afterwards cannot move a finalised week, and if the live hours and the frozen ones drift apart the screen says so and asks you to unlock and re-lock.
What the export is (and isn't). This is an hours export for manual entry or CSV import. HappierBiz never runs pay or lodges STP; your payroll software stays the source of truth for pay. One exception saves the retyping, below.
7c-iii. Weekday, Saturday and Sunday hours
Most awards pay a weekend hour more than a weekday one, so Pay prep & export splits the hours into Weekday, Saturday and Sunday columns beside Overtime, Public holiday and each kind of paid leave. Every column is separate hours, so a row adds across to its total, and you never have to work out from the roster which hours fell on a weekend.
The columns appear only when somebody actually worked that day, so a business that never opens on a Sunday never sees a Sunday column. The day a person worked decides which column their hours land in, whether or not they were rostered on.
To see the times behind a figure, press Open in Timesheets. It opens the same pay period in the Timesheets tab, where each person has a column per day. Under each day's hours is when they actually clocked on and off, written as 9:00a to 1:00p, so a 5.20 against a 5 hour shift shows you it was 8:01am to 1:15pm and you can decide about the extra twelve minutes yourself.
A * after the times means the day had more than one punch, so the span covers a
break; open the person's name for the punch by punch detail. Clock times under
the grid hides them again if you would rather read hours alone.
These times are what was punched, untouched by rounding and by any pay decision. The figure above them is what will be paid. Where they differ, the difference is the rounding or a correction, and both are on the person's own row.
The same split is in the payroll CSV and the printable summary, and weekend hours go to Xero on their own earnings rate once you have picked one (section 7c-iv). You can rename Saturday and Sunday, and set what each is worth, under Penalty rates in the Timesheets tab's Settings, and name the pay code each files under beside the other codes in Finalise & export.
If a row shows ? instead of hours. A week is frozen when you finalise it,
and a day corrected after that (a punch approved a moment later, a Saturday
picked up off the roster) is not in the frozen figures. Rather than show a split
it cannot stand behind, the pay run shows ? for that person and names them
underneath. Unfinalise the period in the Timesheets tab and finalise it again;
the hours are rebuilt from the punches and the columns fill in.
One place the app has to estimate. Adjusting a whole week to a single figure ("this week is 19.5 hours") says nothing about which day the extra or missing hours fall on, so the weekday and weekend columns share the change in the same proportion as the days you worked. If it matters which day, adjust the day itself rather than the week.
7c-iiia. Somebody who is rostered here but not paid here
An owner who takes drawings rather than wages, a volunteer, somebody on an unpaid
trial: all really on the roster, really clocked on, never on a payslip. Open them
in Team, tick Not paid through this system, and save.
They keep everything to do with working: the roster, the time clock, approvals, and their hours are still finalised and kept with everyone's, so a volunteer who later goes on the books has their history. They are left out of the pay run's figures, the payroll file, the printable summary and Xero, including the Xero matching list, so nobody is left with a "not matched" warning they can never clear.
The pay run names them under the hours table, so the omission is something you can see rather than a person who quietly stopped appearing. In Timesheets their row is tagged Not paid here, the week's wage cost leaves them out, and the finalise dialog and the payroll file made from that tab leave them out and say so. Untick it and they are back in the next pay run, with no other change.
7c-iv. Send timesheets straight to Xero payroll (optional)
Xero Payroll has no timesheet file to import, so instead HappierBiz sends the
hours in over the Xero connection as timesheets, one per person for the pay
period. Everything for it lives in one card, Xero payroll, on
Time & pay → Pay prep & export.
Set up, once (about five minutes). The easiest way is Setup, step by step
on Settings → Connections (also the Finish your Xero payroll setup step on
your dashboard checklist): one screen that goes from connecting to the first pay
run in order, says what each step does, and ticks it off the moment it is saved.
You can leave and come back; what is done stays done. The same steps can be done
by hand on the pages below. Settings → Connections also shows, beside the Xero
connection, which steps are still to do.
While Xero is connected but step 1 is not done, the Finalise & export dialog
in Roster says so, because that is the screen you see every pay cycle.
- Set your payroll system to Xero (the Payroll selector on this page; the card also offers it when Xero is already connected).
- In the Xero payroll card press Connect Xero and allow it in Xero (the
same button sits under
Settings → Connections, where the connection can also be disconnected). Your Xero login needs payroll admin access, and the organisation needs Xero Payroll set up with a pay calendar and your employees. If you connected Xero before this existed, the card asks you to connect once more to add payroll access; your settings and synced documents are kept. - Setup stays open until it is complete. It lists everyone on your team who is active and has a login, whether or not they have hours in the period on screen, so matching never waits on a finalised week. Match each person to their Xero employee (matched for you by email address, or by an exact name when there is only one; check before you save) and your pay categories to Xero earnings rates. Ordinary hours is the only one you must set; weekend and public holiday hours fall back to it. Press Save matches. Someone left as Not matched holds nothing up unless they have hours in the period being sent.
- Choose how it runs. All three are off until you choose them:
- Send to Xero when I finalise a pay period. Finalise & export in Roster sends the timesheets in the same step, so a pay cycle is one action.
- Approve in Xero as they are sent. They land approved and flow straight into your Xero pay run. ⚠️ Xero does not let an approved timesheet be changed, so only turn this on once you trust the hours you finalise.
- Send approved paid leave too. Approved paid leave is filed in Xero as leave applications, dated day by day, so nobody is paid short for a day they were approved away. Match your leave types to Xero's when you turn it on. It needs one extra Xero permission; an older connection is asked to connect again.
Each pay run: finalise (lock) the period in Roster. With the first switch on, that is the whole job. Otherwise the Finalise & export dialog reminds you that the hours stay here until you press Send N timesheets to Xero on the pay run page; then Approve all in Xero when you are happy, or approve them in Xero.
The pay period lines up with Xero by itself. The selector picks the length your people's Xero pay calendars use, and for a fortnightly calendar the page also moves to the fortnight Xero expects: every second two-week window straddles two Xero pay periods, and Xero refuses a timesheet that does. Once you pick a week or a period yourself the page stops moving it, and if the window still does not fit, the card says which two Xero periods it sits across.
This period in Xero. The card shows each person's hours beside what Xero holds for the period, read from Xero itself: Not in Xero yet, Draft in Xero, Approved in Xero or Paid through Xero, with Xero's hours. An approved timesheet whose hours differ from yours is flagged in amber, because the person will be paid Xero's figure.
What to expect:
- Locked weeks only. If a week isn't finalised the whole run is refused, and if one person's hours changed since locking, only they are held back, by name.
- Nothing is duplicated. Re-sending updates the same draft. A timesheet already approved or paid in Xero is left alone, and leave already in Xero for the same dates is never booked twice.
- Xero prices the hours. Only hours travel. Xero pays them from the pay rates on each employee's pay template, so set the rates there. Fill missing pay rates from Xero copies Xero's ordinary rate to anyone with no rate here, for the wage estimate on this page only; a rate already typed here is never changed.
- Paid leave is not on the timesheet, by design: Xero pays leave from leave applications, so putting it on a timesheet too would pay it twice. With the leave switch off, the card lists Leave still to enter in Xero after each send, naming who and how many hours. Enter it in Xero (Payroll, then Leave) or they are paid for the days they worked and nothing for the days you approved them to be away.
- The period must match their Xero pay calendar. The pay period selector picks the length your people's Xero calendars use; if a person's calendar differs, the line says so and names the fix. Weekly, fortnightly and four-weekly calendars are supported; monthly is not.
- Salaried staff. In Xero an approved timesheet replaces the employee's normal pay template hours rather than adding to them. Fine for anyone paid by the hour; check with your bookkeeper before sending timesheets for salaried staff.
- Needs Xero Payroll, which is a paid add-on in Australia.
Two-step sign-off (optional). If your business has turned on two-step approvals, a submitted timesheet takes two approvals: the submitter's direct manager confirms the hours first (this writes nothing to pay), then a Payroll Officer does the final sign-off, and only then do the hours flow into the export. A timesheet part-way through shows a "Payroll sign-off" tag. Turn it on and read the full flow in Approvals & payroll sign-off. With it off (the default), approving a timesheet is a single decision, exactly as described above.
Pay public holidays. A toggle in the timesheet settings: when it's on, a public-holiday closure pays the rostered hours, and public-holiday hours are tagged separately on the timesheet and the export, so you can apply penalty rates in payroll.
7e-iv. Tell it when your pay periods start
Two settings decide which dates a pay period covers, both in the Timesheets tab under Settings:
- Week starts on. The first day of your pay and roster week. Any day of the week, so a business that runs Wednesday to Tuesday sets Wednesday here.
- Pay periods start on. A date one of your pay periods began. Pick any one and every period lines up with it from then on, so a fortnight is always the same two weeks. It moves with the Period setting beside it (weekly, fortnight, four weeks).
The box shows the period you would be in right now before you save, so you can check it against the one you are actually paying. If the date you pick is not on your week start it is kept as the start of that week, and it tells you so.
Leave it empty and the pay run works the period out from whichever week you are looking at, which is what it did before this setting existed.
With a date set:
- The Pay run opens on the last pay period that finished, which is the one you are about to pay, and the arrows move a whole period at a time.
- Finalise & export in the Timesheets tab covers the period the week you are looking at belongs to, and names its dates on the card.
- Both screens read the one answer, so they can never show different fortnights.
If you use Xero, you should not need to set this at all. The last step of Set up Xero (Accounting & reports) reads the pay calendar your matched team is on and, if you have not set a pay period yet, sets yours to follow it and says so. If you had already set one that does not line up, it offers Follow Xero's calendar instead of changing it for you. It will not set anything while your people are on calendars of different lengths or different weeks, or while Xero's periods start on a different weekday from your week; it says which, and what to change. The pay run also offers Match Xero whenever a period does not line up, and that saves the start date as well as moving the window.
7f. Finalise a pay period
Once a week's hours are right, you can finalise it. Finalising freezes that week's payable snapshot, so a later change to a setting or the roster can't quietly move numbers you've already signed off, and it blocks edits to that week's overrides, breaks, approvals and TOIL. The week shows who finalised it and when.
You can do it from either end of the pay cycle, and both take the whole period at once:
- From Pay run (Time & pay → Pay prep & export). If any week in the period is not finalised, the page says so and offers Finalise these N weeks. It lists every week with its people and hours first, so you can see exactly what is about to be frozen. When it is done the hours, the CSV and the Xero send all become available on that same page.
- From the Timesheets tab, Finalise & export does the same and downloads the payroll file for the span in the same step.
You never have to finalise week by week, and you never have to move between the two screens to do it.
- If a week still has hours waiting for approval, finalising stops and tells you which weeks to approve first, so you never freeze someone's hours at zero. Approve them in the Timesheets tab or the Approvals inbox, then finalise.
- If payroll needs to correct a finalised week, unfinalise it in the Timesheets tab, fix it, and finalise again.
- Exporting records an exported-at stamp on each week, so a re-export is visible and you can see the week was already sent to payroll.
- Finalising, re-opening and exporting all need Edit / approve timesheets, and each is written to the business Activity Log.
7f-ii. Set up the MYOB export so it imports cleanly
MYOB only accepts a timesheet row if its pay code (the Activity ID) and the employee code already exist in your MYOB company file, spelled the same, in capitals, up to eight characters. HappierBiz can't know your MYOB codes, so it gives you a quick one-time setup and sensible defaults.
- Choose MYOB in the Payroll dropdown on the Finalise & export card, then open MYOB pay codes.
- Each pay type (ordinary, overtime, public holiday) and each leave type you use
shows an editable code, pre-filled with a tidy default (for example Annual
leave becomes
ANNUAL). Change any to match the exact pay code you have in MYOB, then Save codes. Copy list for MYOB copies the whole list so you can set the same codes up on the MYOB side. - Employee codes. The panel lists everyone in the file with the code they'll export as, and flags anyone matched only on their surname (which can go wrong) or sharing a code with someone else. For a reliable match, put each person's MYOB Card ID in their Team profile (Team, open the person, the employee ID field); the export uses that when it's set.
- In MYOB, turn on timesheets, make sure each pay code above exists and is linked to each employee, then import via File, Import Data, Timesheets and map the columns. MYOB imports the rows that match and lists any it can't, so you can fix a code and re-import.
Note: only MYOB AccountRight (desktop or browser) can import timesheets; MYOB Business online can't, so there you key the hours in by hand from the file.
7e. Time in lieu (TOIL)
TOIL is a per-person balance of time owed for extra hours worked: positive = banked (you owe them time), negative = used. The running balance sits in the balances panel on the Leave page (Time off & shifts → Leave), and each staff member now sees their own balance in My Work.
Banking time (four ways):
- Log it by hand, in the balances panel, pick a person, enter the hours and a note. This is the quick "you worked back two hours on Tuesday" case.
- Bank a timesheet variance, on a clocking person's timesheet row, the Bank to TOIL button banks the difference between clocked and rostered hours.
- Staff bank it on their own timesheet, when a set-hours person confirms their week, they can tag part of a day Bank to TOIL; it lands when you approve the week.
- Auto-accrual (optional), turn on "Auto-bank over-roster hours" in the timesheet settings and, whenever you approve a timesheet, any hours above the roster that weren't tagged as overtime bank to TOIL automatically. Your approval is the gate, nothing accrues without it.
Using time (taking a TOIL day off). Staff take TOIL as time off by requesting leave of the "Time off in lieu" type (or whichever leave type you choose in the TOIL settings). Approving that request draws the balance down by the hours off, blocks the roster and bookings for those days like any leave, and emails the staff member. Cancelling it hands the hours back. Staff can't request more TOIL than they have, the app stops the request with the exact figures.
Guardrails. Set an optional cap so a balance can't grow past, say, 40 hours, and the app won't let TOIL be overdrawn (used below zero). Every change is logged in the business Activity Log.
8. Examples
- Beginner (café): roster Floor and Kitchen for the week; staff clock in; approve and export Friday.
- Real-world (gym): trainers' regular patterns auto-fill; add a casual to cover a sick call; a public-holiday closure blocks the day.
- Advanced (multi-role venue): roster across Floor/Parties/Setup roles, fix a miskeyed clock-out on the day it happened, then export approved hours.
9. Reports & exports
- Timesheets per week, approvable.
- Payroll CSV export of approved hours (hours only, for manual entry or CSV import into your payroll software; no pay runs or STP from here). With the Xero connection, the Pay prep & export page can instead send the period to Xero payroll as draft timesheets.
- Printable summary, one page per employee, to read off while entering hours into Xero, QuickBooks or MYOB. Public-holiday hours are tagged separately when Pay public holidays is on.
- On shift (clocked-in now) shows on the dashboard.
10. Common mistakes
- Exporting before approving, approve the week first so payroll gets final numbers.
- Forgetting closures, mark business closures so days aren't rostered or counted.
- Using a closure to hold back one room, that shuts the whole business for the day and tells the roster you are closed. Block it out on the Calendar instead, which stops the bookings and leaves the team working.
- Editing a pattern vs a single day, use a day-off override for one-offs; change the pattern for ongoing changes.
- Assuming a standard-week change only affects future weeks you have not looked at yet. It reaches every upcoming week that was auto-filled, which is the point. If you want one week different, change the shifts on that week instead: a shift you edit by hand is never touched again by the standard week.
- Expecting a note to reach the whole team on its own, the roster email goes to the people who are ON the week. If the note is about a meeting or a change everybody needs, tick the second box so the people with no shifts get it too.
- Ignoring leave clashes, approved leave blocks bookings, but check the roster reflects who's actually off.
- Turning the Roster module off to stop clocking, that's the wrong switch.
The clock has its own toggle at
Settings → the "Team" tab → Time clock. Turn that off; leave the Roster module as you need it. - Paying an auto clock-out without checking, auto-closed entries are an estimate. Review and approve them before the payroll export.
11. Troubleshooting
| Problem | Fix |
|---|---|
| A staff member isn't on the grid | Add them in Team → Staff list and set their pattern. |
| Hours look wrong | Expand the person's row to see each punch beside the hours it pays, then click the day that is wrong and choose Rostered, Clocked, or type a figure (5.5 or 5:30). |
| A number I typed did not stick | The box selects its contents when it opens, so what you type replaces the old figure. Press Enter or Save; a value that is not a time is refused rather than saved as nothing. |
| A day shows ⚠ | The clock and the roster disagree there and nobody has decided yet. Click the day and pick one; the flag clears. |
| Someone's minutes are missing | If Round to roster is on, small differences pay the rostered time. Hover the day to see what was clocked, and click it to pay the clocked figure instead. |
| Can't approve/export | You need Edit / approve timesheets. |
| A closed day still shows shifts | Mark it as a business closure. |
| Where do I turn the clock off? | Settings → the "Team" tab → Time clock → "Use the time clock". It's separate from this module, and it works whether or not Roster is on. |
| A staff member can't clock in | They likely have no rostered shift now and "Only clock in with a rostered shift" is on, roster them, or relax the rule at Settings → the "Team" tab → Time clock. The blocked attempt is listed in Timesheets. |
| Someone clocked in as someone else (kiosk) | Switch the kiosk to Personal PIN at Settings → Kiosk → How staff clock in. |
| Nobody can clock in and it says "Turn on location" | The on-site check is set to required and the phone is not sharing a location. The person allows location for the site in their browser settings, or you switch the check to flag-only at Settings → the "Team" tab. Staff standing at work whose phone only knows the suburb are let through, so this is a location that is off, not one that is vague. |
| The on-site check flags nobody | Open Settings → the "Team" tab → Location check on clock-in and look at the pin. A check with no workplace pinned does not run, and the tick clears itself when you save to say so. Check the pin is the workplace and not your house. |
| A shift shows "auto clock-out · check" | They forgot to clock out, so it was auto-closed at the rostered end (+grace). Review and approve it. |
| How does someone record a break? | They punch out and back in, and the gap is unpaid with nothing to type. Otherwise you type the minutes in the break box on the row, or set the automatic rule. See §7b-ii. |
| Someone shows twice on one day | Two punches on one shift, which is what an unpaid break looks like. Their paid time already excludes the gap, and attendance counts it as one shift. |
| A break shows on the timesheet but pay didn't change | The automatic rule applies to rostered hours only unless Also apply to clocked time is ticked. Tick it, or type the minutes on the row. |
| Someone got paid for a break they didn't take | Type 0 in that row's break box. A figure you set by hand always beats the automatic rule. |
| I added a shift after publishing. Does the whole team get emailed again? | No. Press Re-publish and the panel lists only the people whose own shifts changed, with a tick you can clear. Everybody else is left alone. See §7a-iv. |
| I changed a shift and nobody was told | Nothing is sent until you press Re-publish. The roster says "Changes have been made. Re-publish to let them know." until you do. |
| The panel says somebody has no login | There is nowhere to send them anything, so they have no tick. Invite them in Team → Staff list, and in the meantime tell them yourself. |
| Somebody I unticked is still on the list | On purpose. A change nobody has heard about is not finished, so they stay there until they are emailed. |
| Somebody is around but not working, how do I record that? | Press + on their empty day and switch to On call. It is never paid and they are told when you publish. See §7a-iii. |
| An on-call day is showing hours | It cannot. On call is not a shift: it is stored separately from the roster and no part of pay, timesheets or the payroll export can see it. |
| Somebody says they never hear about roster changes | Check their own switches in Settings → Notifications: the in-app message always arrives, but email and phone notifications are each person's own choice. |
12. Error messages
Roster edits and approvals confirm inline (e.g. "Week approved"). The payroll export is disabled until there are approved groups to export.
Related: Approvals & payroll sign-off · Leave · Shift requests · Calendar · Kiosk (a tablet on the counter)