
Module · Shopping list
Where to find it in the app
- Use it: Stock → Shopping
- Turn it on/off: your business name (top-left) → Settings → Modules → Stock → Shopping list
Plan: Solo & Business · Module group: Stock · Navigation:
Stock → Shopping
1. Overview
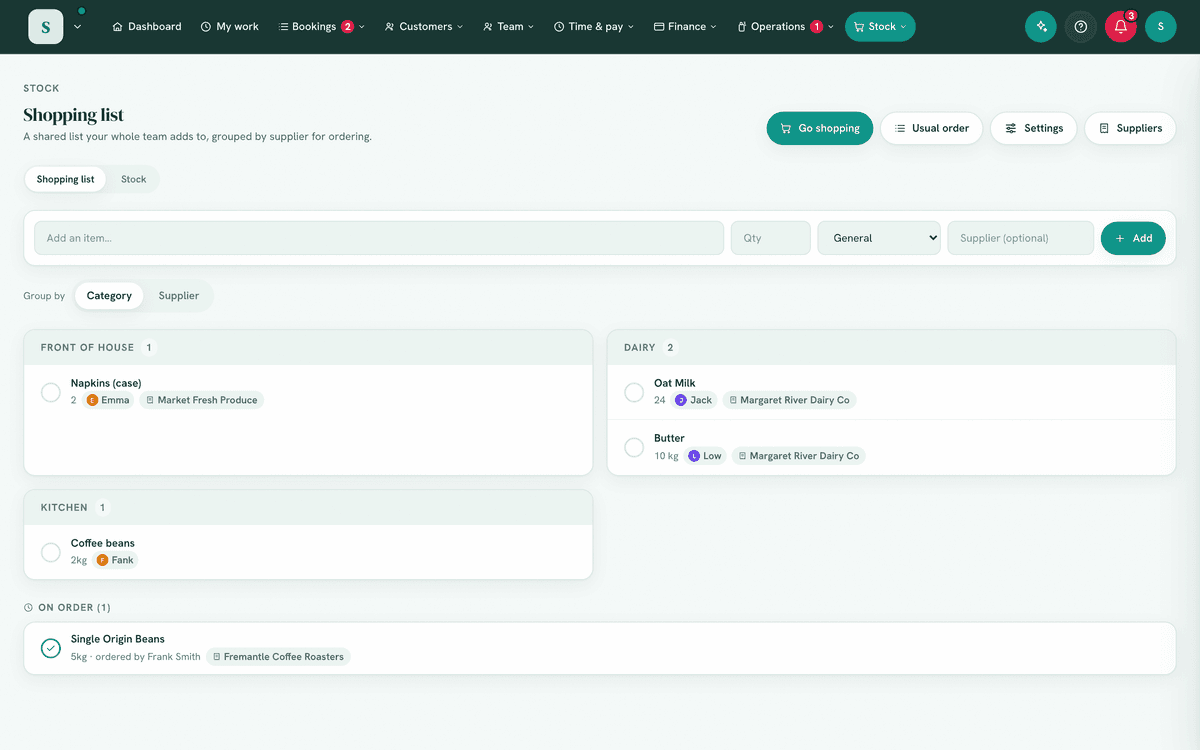
Purpose. A shared, synced ordering list that replaces the back-of-house whiteboard. Anyone can add what's needed, group by category and supplier, and tick items off as they're ordered and received. It can also track stock levels and suggest low items to add, and holds a suppliers directory.
2. When to use it
- For day-to-day "we're out of…" ordering.
- To keep supplier contact and account details handy.
- To turn low stock into an order list.
3. Required permissions
- View shopping list (
shopping.view). - Add / edit shopping items (
shopping.manage).
Staff permissions. Managers can set exactly what staff with view access may do here, open the list's settings and toggle Add items, Tick items off, Remove & clear items, Receive into stock and Edit the supplier book to suit your business. Managers can always do everything.
4. Navigation path
Stock → Shopping
5. What you'll see
- The list of items, each with quantity, category and optional supplier, and a status (needed → ordered → got).
- An Add item field (with qty, category, supplier).
- A prompt to Add N low items to the list when stock tracking flags items below their level.
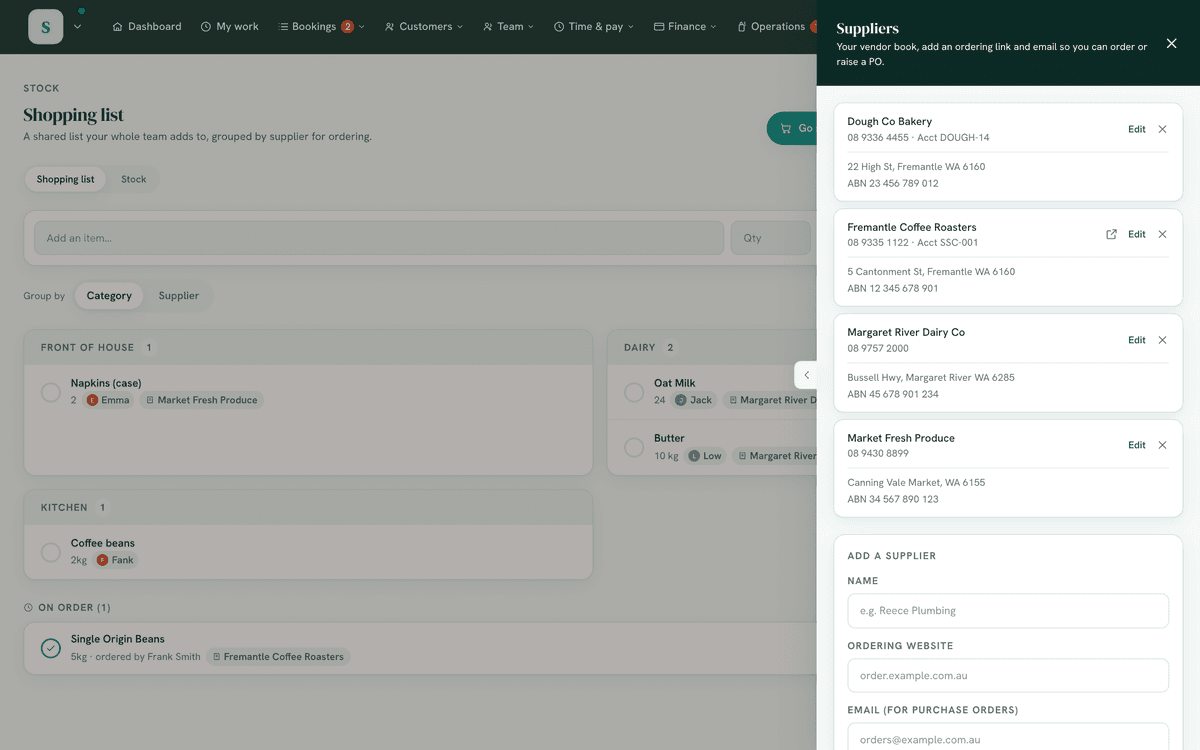
- A Suppliers directory (name, website, phone, email, ABN, address, account reference, notes).
- Go shopping, a full-screen, phone-first version of the list for the aisles: big rows you tap to tick, live progress, and a Print button for a paper checklist.
6. Turning it on
Switch it on in Settings, the Modules tab, under Stock (available on both plans). If you chose a relevant business type at sign-up, you'll start with a few example items.
7. Step-by-step tasks
7a. Add and order items
- Type an item in Add item, with a quantity, category and (optionally) supplier. Tap the Supplier box and your suppliers drop down: pick one, type a few letters to narrow the list, type a name nobody has used before, or leave it empty. A brand new name also offers Add to your supplier book, so next time it is in the list and can hold their website, phone, ABN and account reference. Then add it. Adding something that's already on the list folds into the one line, summing the quantity when the units match ("1kg" then "2kg" becomes "3kg") and joining them as text when they don't ("1 bag + 2kg").
- The round tick on the left of a line marks it bought, and it moves to the Bought section. That is the only control most people ever need.
- If you ring a supplier and wait for a delivery, On order on the line moves it to an On order section in between, so nobody orders the same thing twice. Tick it off when it arrives. If you just go to the shops instead, turn We order ahead and wait for delivery off in the list's settings and the On order step disappears. Anything already on order stays on screen either way. The list stays in sync for everyone.
7b. Add low stock to the list
- When stock tracking flags items below their level, choose Add N to list.
- They drop into the shopping list ready to order. With Add low stock to the list for me switched on (the default, in the list's settings), this also happens automatically the moment an item drops to its reorder level.
- Typing an item by hand whose name matches a stock item links the two, so it can be received into stock once bought.
7b-ii. Receive bought items into stock
- When a stock-linked item is marked got, a Receive to stock button appears on it.
- One tap adds the quantity to the item's on-hand count and takes it off the list. Managers can always do this; staff can when Receive into stock is switched on in the list's settings.
7a-ii. Change an item after you have added it
Every line still on the list has Change on it, whether it is needed or already ordered. That opens the item, where you can set:
- Item, the name. Renaming onto something already on the list is refused, rather than quietly making two lines of one thing.
- How many, free text so you can write it however you say it (
3,2 kg,a few trays). A plain number gets a plus and a minus beside it; anything wordier is left exactly as you typed it. - Group and Supplier, the same lists the add box offers.
- Note, for the brand, the size, which aisle, anything worth saying. It shows under the name on the list and in Go shopping.
- Urgent, which pins the item to the top of its group and flags it, for what cannot wait for the next order.
Remove from the list is at the bottom, on its own, away from the fields.
7a-iii. Nothing is deleted by accident
Removing an item no longer asks you to confirm. It removes it and offers Undo in the message at the bottom of the screen, which is the protection that actually works: a confirm box on every delete gets dismissed without reading, and then the item is gone with nothing left to say what it was. Undo puts it back with its quantity, group, supplier and note.
7a-iv. It tells you what is already on the list
As you type into the add box, anything matching that is already on the list appears in amber above the suggestions, with how many are already down. Tap it to open that line instead of adding a second one. Adding it anyway is still safe: the quantities fold into the one line rather than stacking duplicates.
7b-ii-b. The Bought list, and clearing it
Items you tick off drop into Bought at the bottom of the list and stay there until somebody clears them. Nothing removes them on a timer, so the section is a record of what has been bought since the last clear, not just today's shop.
- Put back on a row returns that item to the list, for the thing ticked off by mistake or used up again straight away. The green tick does the same.
- Bought folds itself once it is longer than a glance, so the live list stays where you can reach it. Tap the heading to open or close it. The folded line says how many there are and how many are still to be received into stock.
- Newest first, so the shop you just did is at the top.
- Clear N bought at the top of the page removes every bought item for good. Use it after the shopping is put away, or whenever the section gets long.
- The x on a row removes just that one, and the green tick puts it back on the list.
- Only the 200 most recent bought items are shown at once. Past that the section says so, and the count and Clear still cover every one of them.
- Clearing does not undo anything: hours, stock counts and expenses are recorded where they belong, and the list is only the list.
7b-ii-c. Buy it again
Every item you tick off is remembered, so the things this business buys are never lost when the Bought section is cleared.
Buy again appears in the row of buttons at the top as soon as anybody ticks something off, and stays from then on.
- Buy again opens everything you have bought before, newest first, with how many times and when you last bought each one. Switch to Most bought to see the regulars instead.
- Add puts one back on the list. The button at the top adds the most recent dozen in one go. Anything already on the list is left out, so nothing is ever added twice.
- Usual order on a line promotes it into your weekly staples, so next time it arrives with the rest of the order.
- The x stops an item being offered again, for the thing bought once by mistake. Managers only, since the history is shared.
As you type. The add box offers what you already buy after the first letter or two, marked usual order, bought before or stock. Tapping one fills in the quantity, category and supplier too, so a weekly item is two taps rather than four fields. Anything already on the list is never offered.
7b-iii. Stock items: archive & restore
Archiving a stock item hides it (keeping its full movement history); Show archived items at the bottom of the Stock page lists them with a Restore button. Each movement in an item's history shows who recorded it.
7c. Go shopping (at the shops)
- Tap Go shopping for a full-screen list built for one hand in a shop: big rows, tap anywhere on a row to drop it in the trolley, tap it again to put it back.
- If the list has more than one supplier, it asks where you are going first. Pick a shop and you get only their items, grouped by category. The trolley, the progress bar and the printed sheet all follow that choice, so nothing on screen is about a shop you are not standing in. Choose Everything for the whole list, still kept apart by supplier.
- Finish a shop and it says so, with a one-tap button through to whatever is still to get at each of the others. Tap the supplier name at the top any time to switch.
- Print gives you a pen-and-paper checklist of whatever the screen is showing, headed with the supplier it is for.
- Two people can shop together: the list refreshes every few seconds, so you each see the other's ticks.
- On a phone, use Add to home screen and it opens full-screen straight into this view.
7d. Manage suppliers
- Open Suppliers.
- Add a supplier with their website, phone, email, ABN, address, account reference and ordering notes (e.g. "Order by 2pm for next-day").
- Assign items to a supplier so the list groups by where to order, and so Go shopping can offer one trip per shop.
8. Examples
- Beginner (café): add Full cream milk · 6×2L · Kitchen and tick it off once ordered.
- Real-world (restaurant): group the list by supplier so each order is one glance; store Bidfood with the account ref and cut-off time.
- Advanced: use stock levels so the system surfaces low items and you bulk-add them to the next order.
9. Reports & exports
The live list (grouped by category/supplier) and the suppliers directory are the record. Items to order also show as the dashboard Shopping to order shortcut.
10. Common mistakes
- No supplier on items, then the list can't group by where to order, and Go shopping has no shops to offer you.
- The same supplier spelled two ways, then one order looks like two. Pick them from the Supplier box rather than retyping the name.
- Not marking items got, the list grows stale; tick them off on arrival.
- Duplicate items, search the list before adding.
11. Troubleshooting
| Problem | Fix |
|---|---|
| Low-stock suggestions don't appear | Set stock levels on items so the system knows what "low" is. |
| The dashboard shortcut count looks wrong | It counts items still needed; mark ordered/got to clear them. |
| The Bought list has got very long | Nothing clears it on a timer. Use Clear N bought at the top of the page. Nothing is lost: it is all in Buy again. |
| I deleted an item by mistake | Press Undo in the message at the bottom of the screen. If it has gone, add it again from Buy again. |
| Two lines of the same thing | Rename one with Change, or remove it. Typing a name already on the list folds into the one line, so this only happens if the two are spelled differently. |
| An urgent item is not at the top | Urgent pins it to the top of its own group. Switch Group by to see the whole list in one order. |
| An item I buy is not offered in Buy again | It appears once it has been ticked off the list at least once. Items bought before this feature existed are not there. |
| Something wrong is offered every time | Open Buy again and press the x on that line. Managers only. |
| Can't add or edit | You need Add / edit shopping items, or, for staff with view access, a manager has that staff permission switched off in the list's settings. |
12. Error messages
Adds and status changes confirm inline. The list syncs across devices, so another staff member's change may appear as you work, refresh if needed.
Related: Recipes & menu